Rainmail Server User Guide
ContentsIndexHome
PreviousUpNext
Login

To use the Webmail included with Rainmail Email Server, user has to log in to the Webmail application.
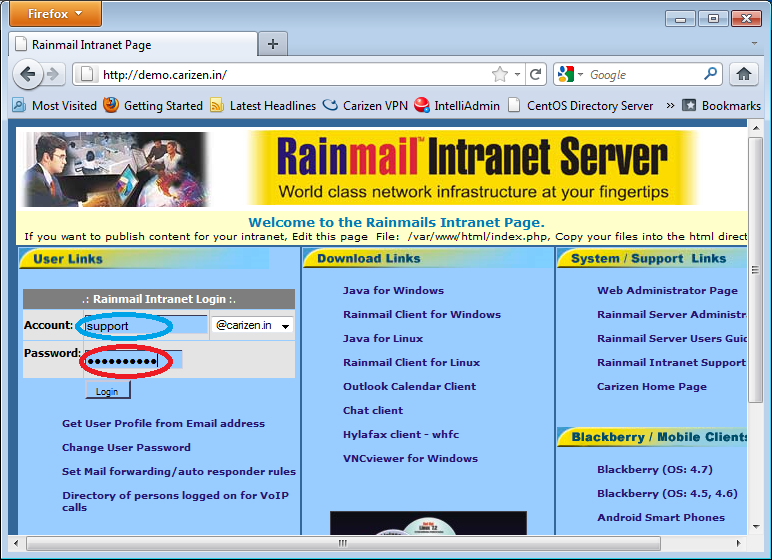
  1. From an Internet browser, open up Rainmail Server home page. That will display the following Window.

  1. Enter the user part of your Email ID in the Account: field. The field is indicated by a Blue Oval.
  2. Enter your Rainmail Account password in the Password: field. The field is indicated by a Red Oval.
  3. Click on Login.
  4. When you login for the first time, the following Window will be displayed.

  1. Click on Continue. That will bring up the following Window.

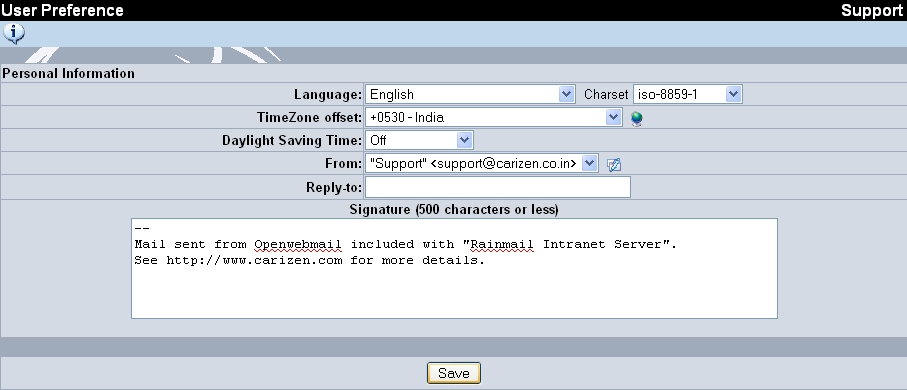
  1. Default preferences for users are displayed. If you want to change any of the set preferences, it can be done here. Please note that these preferences can be changed at any point of time by going to Preferences section. Click on Save to proceed. The set preferences will be stored and following dialog displayed.

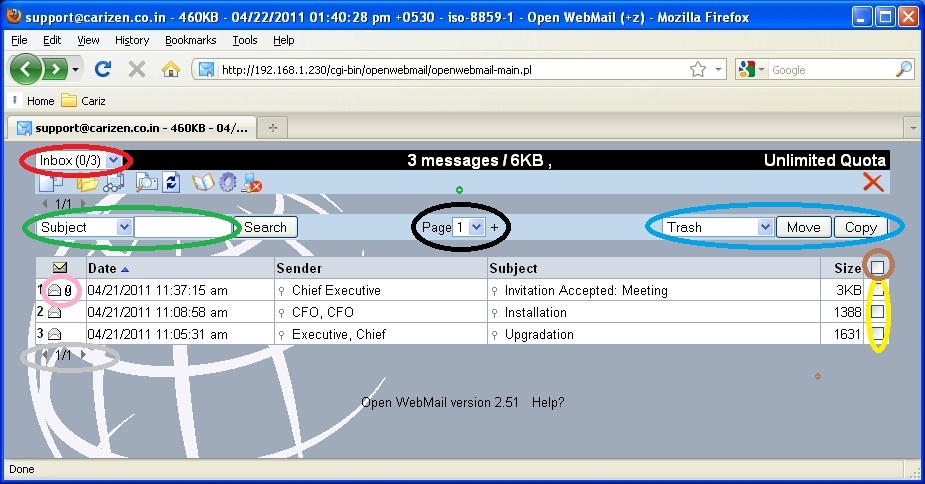
  1. Click on Continue button. That will log the user in and display the Home page as follows:

  1. We will see a brief set of functionality allowed in the window above:
Sl. No. 
Indicated by 
Function 
Detailed description 
Red Oval 
Folder List 
This list box contains the list of all Email folders. By default, Web mail creates following folders:
  1. Inbox
  2. Saved
  3. Draft
  4. Trash
  5. Spam
  6. Virus
Users can also create custom folders. By default the current folder is selected in this list box. User can move to a different folder by selecting the folder name from the list. Once selected, the application changes to the selected folder and displays the Email in that folder. 
Green Oval 
Quick Search functionality 
This combination of List box and Edit box allows user to quickly search for an email in the current folder. Users can select a field from the List box. The available list of fields are:
  1. From
  2. To
  3. Subject
  4. Date
  5. AttFileName (File name of attachment)
  6. Header
  7. TextContent (Body text)
  8. All (Anywhere in the email)
User can do a quick search as follows:
  1. Select a field from the List box.
  2. Enter the search term in the adjacent Edit box, and
  3. Click on Search
The application will search for emails that match the given criteria and only display those emails. 
Pink Oval 
Message Details 
The icons in the Pink Oval gives status of the email. The following icons are used to represent the status:
  1. Email is Unread
  2. Email has been read
  3. Email has an attachment
  4. Email has been forwarded or replied to.
 
Grey Oval 
Page details 
Web mail application displays 10 emails in a page. If the number of emails in the folder exceed this number, the emails are shown in multiple pages. If that is the case, this section displays the current page and total number of pages. 
Black Oval 
Page Navigation 
When there are multiple pages of emails in current folder, user can move to a different page by selecting the Page Number from this List box. Once a page number is selected, application displays the emails in that page. 
Yellow Oval 
Message selection 
The check boxes next to the emails can be used to select the messages for certain operations (like Delete, Move, etc.) For example to delete an email, user can check the box next to Email and Move the email to Trash folder. 
Brown Oval 
All Message selection 
To select/deselect all emails in the page, this check box can be used. When checked, all emails in the page are selected. When unchecked, all emails in the page are de-selected. 
Blue Oval 
Message move/copy to Folders 
This section helps to move/copy the emails to a different folder. User can do the same as follows:
  1. User selects set of emails (by checking the boxes next to emails).
  2. User selects the folder to move/copy the emails to form the Folder list (in the Blue oval).
  3. To move the emails, user clicks on Move button.
  4. To copy the emails, user clicks on Copy button.
  5. When emails are copied, they are available in the source as well as destination folders.
  6. When emails are moved, they are deleted from the source folder and available only in the Destination folder.
  7. There are few pre-defined folders like --DELETE--. User can delete emails by moving emails to this folder.
 
Copyright (c) 1999-2014. Carizen Software (P) Ltd. All rights reserved.
What do you think about this topic? Send feedback!